So if you read my introduction to this series, you will know that I have attempted to address the common issues with ‘self-hosting’ by adopting a hybrid approach, relying on two types of relay service:
- An SMTP (outgoing) relay – this is in many ways the most important of the two, as it avoids our mail being marked as spam and the pitfalls associated with setting up a trusted mail server (such as setting up PTR, DMARC, DKIM and SPF records). I chose to use a service called MailGun given their free monthly limit 625 emails a month (fine for my needs)
- An incoming store and forward service – this provides a way of capturing any mail that arrives for 30 days in the unfortunate event the local mail server goes down (for example your ISP service goes down temporarily). It also has the added benefit of being able to keep my email server’s IP address masked by the Cloudflare reverse proxy service. For this I chose to go with Dynu.com’s Email Store and Forward Service for £10/mth.
SMTP (outgoing) Relay – Configuration
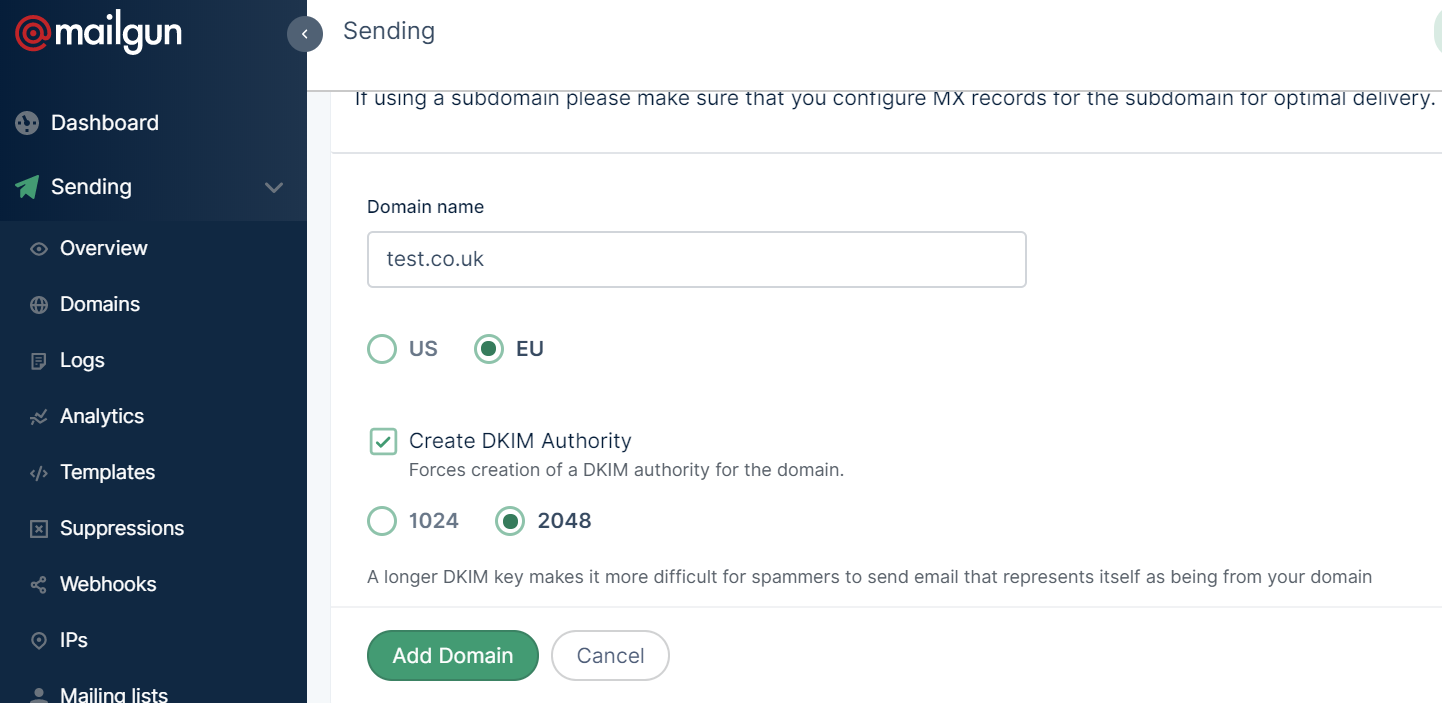
To set up MailGun you need to signup for their free service at www.mailgun.com (I would recommend setting up two factor authentication and using a strong password of suitable complexity and length). Once you’ve signed up you should be directed to the dashboard page. Here you need to click on the ‘Sending’ dropdown menu item on the left panel, selecting the ‘Domains’ option and then clicking on the ‘Add New Domain’ button on the right of the screen (as pictured below).

You can choose either US or EU servers (given I’m in the EU I chose EU which helps with GDPR compliance). It then asks you about setting up a DKIM Authority as shown below. This is highly advised – I would choose 2048 bit rather than 1048 – it doesn’t impact on the performance of the service and it just makes it that bit more secure. Once you’re done, click add domain and voilà , your domain is added – you will then be redirected to a guide on how to set up the relevant DNS records for your domain.
You only need to worry about the two TXT DNS records for sending mail – specifically the SPF and DKIM records as pictured below. Note these are just examples – please use the ones MailGun lists for your own domain. These records are not secret, and will be publicly visible through DNS querying, so there is no need to worry about keeping them hidden.
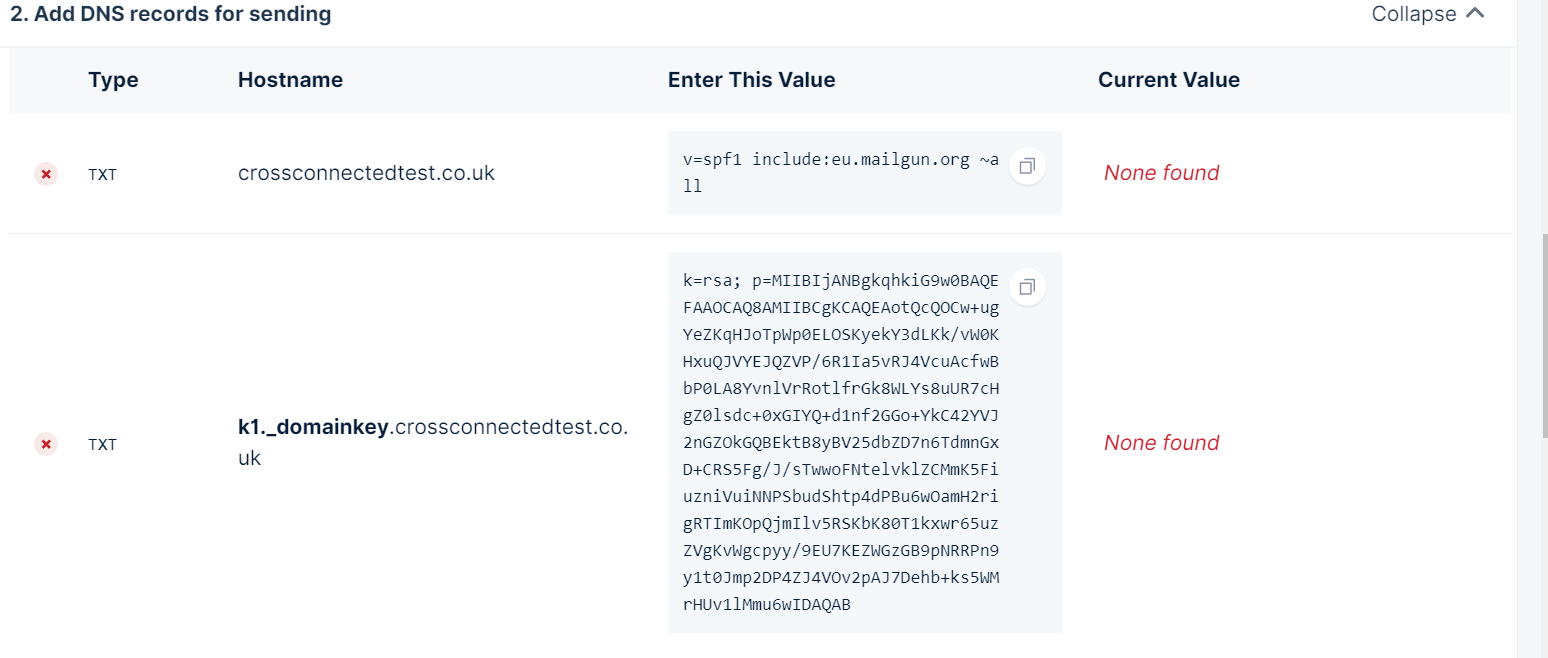
MailGun provides good guides at the top of the page explaining how to set up such records. Note, this guide assumes you are using Cloudflare as your DNS manager, and as such you need to make sure you do not proxy the two TXT records (you need to un-check the orange cloud so that “DNS only” is displayed under the Proxy Status for the DNS entry within Cloudflare’s DNS settings for your domain).
Once you’ve added these records, click the ‘verify DNS settings’ button in MailGun to check the changes have propagated (this may take 24-48 hours, although it should be pretty quick in most cases)! Keep checking back on MailGun to check the propagation – if MailGun hasn’t validated the settings after 48 hours, you’ve probably made a mistake copying the two TXT records – carefully recopy and try again.
Once propagated the SMTP relay is set up and ready to use – you now just need to get the login credentials and set up your local mail server to relay outgoing mail through this server. MailGun’s login credentials for you domain can be found by navigating to ‘Sending->Domain Settings’ and then selecting your domain from the drop down list towards the top of the page.

You can either use the postmaster@domain username or your own full email address. You will need to get the password by resetting it using the reset password button (record this securely for later use with your local mail server). Note also the SMTP url (smtp.eu.mailgun.org in my case) and the port (I chose to use 587, but all the ports use SSL/TLS encryption so it’s personal preference which one you choose to use).
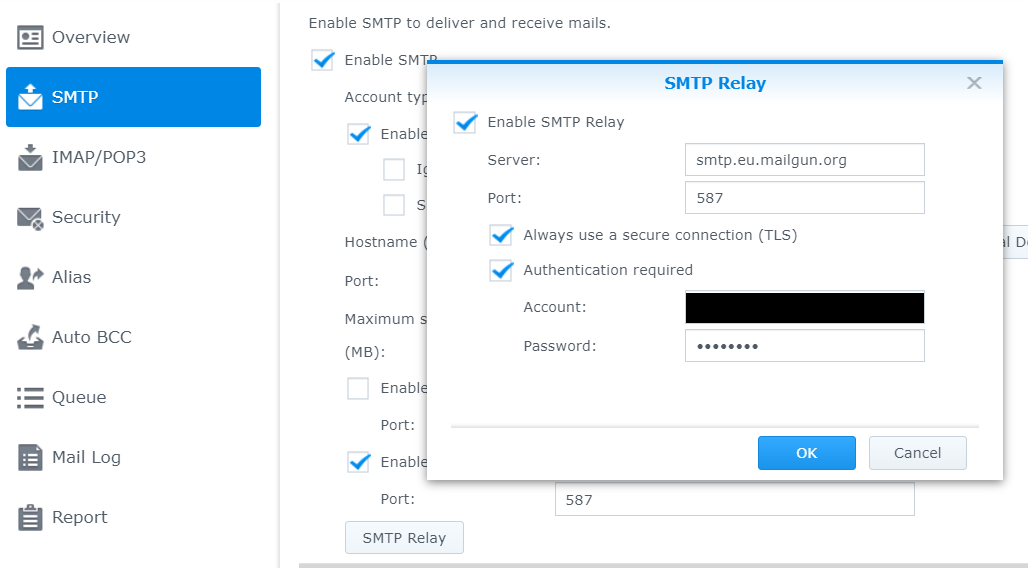
Once you have the above information, you then need to set up your local mail server. In my case, the Synology mail server has a handy GUI to input this information as pictured below (note I’ve chosen to always use TLS, given MailGun requires this for a secure connection). If you are using a different server, you will need to investigate how to set up the outgoing SMTP server using a mail relay service with authentication.
Once you’ve set all this up, you should now be able to send email locally through your local SMTP server without emails going to spam. At this point, I would advise you to run a test, grabbing the email headers from any received from your relay to another email address you own. You can then check if DKIM and SPF are set up correctly using this helpful tool from Google. You should get a green PASS for DKIM and SPF when pasting in the email header information from the received emails – this shows your DNS records and SMTP relay are configured correctly, reducing the chances your mail will end up in someone’s spam folder (good to know)!
You can now proceed to my next article describing the setup of the incoming relay.
0 Comments