So in my last post I talked about why I’d decided to go down the route of partially self-hosting my email service. In this post I’ll start with setting up the basics.
Unless your internet service provider (ISP) provides you with a static public IP address, the first thing most people will need to do (if they haven’t done so already), is set up Dynamic DNS. You will also need to register a custom domain from a domain registrar (but don’t point this to your dynamic DNS subdomain/static IP address just yet – I’ll explain why later)!
Most residential ISP tariffs don’t offer static public IP addresses, but if you’re not sure, check with your ISP. A static IP means your internet address stays the same 24/7 – a dynamic IP changes at the will of your ISP. To host any kind of service with a dynamic IP, you need to use a service that keeps track of the changes (a so called Dynamic DNS service). Such services usually allocate you a free sub-domain, such as your-chosen-sub-domain.service-provider.com. This sub-domain will remain the same, but the IP it points to will update as your ISP’s dynamic IP address changes.
There are numerous services to choose from, but if you don’t want to install any software on your server, you might wish to check your router settings to see which Dynamic DNS providers your router supports. Unfortunately, each router is different, so a specific guide isn’t possible to write. However, there are many guides covering the basics out there – one such guide being this one from NoIp (who also happen to be a pretty good free Dynamic DNS service provider, if you choose to go with them). Whichever service you choose though, I would recommend you settle on one that offers a sub-domain with SSL support (i.e. https rather than http, for reasons I’ll explain later).
You will also need to set up a local mail server – I chose to use my Synology NAS’ default mail application, but if you’re using Linux, a good alternative is postfix (indeed Synology’s app is built on postfix). Once again there are numerous tutorials out there to follow – just bear in mind security pointers to avoid your server becoming a spam bot (especially when it comes to authentication and transport encryption). Note ignore any steps that involve port forwarding for now, as the way we will set up this mail server avoids us exposing it openly to the internet. Nevertheless, it is still wise to lock down the server with authentication and StartTLS/TLS encryption, as if your network is compromised with malware, it could still be used as a spam relay if there is no authentication.
You will also need to assign your mail server a local static IP address, rather than a dynamic IP assigned by your router over dynamic host configuration protocol (DHCP). Note your local IP address is different to the public IP address assigned by your ISP. Your router allows multiple devices to share your public IP address by assigning your network devices local IP address using a defined private network subnet (usually something like 192.168.x.x or 10.0.x.x). To assign a static IP address on a Synology NAS your can follow this video. For a Linux server the process can vary, but here are steps for a well known Debian based device.
To enhance the security of my setup, and mask the public IP address of my mail-server, I also chose to setup a free account with Cloudflare. For those who don’t know about Cloudflare, they are an American web-infrastructure and website-security company offering a variety of services at differing cost brackets. They are also registered on the US Privacy Shield Framework, which at the point of writing, helps with GDPR compliance. Their free service includes DNS management, a reverse proxy and basic DDoS attack prevention, as well as free modern SSL services to help secure your server’s traffic.
Provided you setup Cloudflare correctly, the reverse proxy ensures that anyone querying your custom domain is shown Cloudflare’s server IP addresses rather than your own server’s IP (helping to protect your server). The other added benefit is that Cloudflare provides a managed free universal SSL certificate for your domain, adhering to modern day standards (useful if you wish to host a website using this domain). Of course, you could use Let’s Encrypt for this, but their requirement for 90 day renewals can be a pain, and their basic authentication process is not ideal, relying on opening up port 80. Cloudflare avoids all of the faff regarding managing your SSL certificates, and is more or less “set and forget”.
This series of guides will assume you have also chosen to use Cloudflare, so in addition to the above, you will need to set up a free account, migrating the nameservers for your domain over to Cloudflare’s servers, as explained in their helpful guide. Note the process of switching nameservers can take up to 48 hours (usually it’s far quicker, but be prepared to wait for a while). When setting up an account, Cloudflare will also ask you to set up your DNS records. If you only intend on using your domain for your email server, you can leave the DNS blank with no entries for now (we will discus required records in another post). However, if you wish to also run a website for the domain, you will need to set up DNS records pointing to your web server (be it the same server as your email server, or a different one entirely).
Given this series is solely focused on our email server, I will discus the process of setting up a web server using Cloudflare (for either a static or dynamic IP address) in another post. Just bear in mind that for any record you add intended for http (web server) traffic, it is wise to enable Cloudflare’s proxy service to mask the web server’s IP (especially if you run several services from the same server).
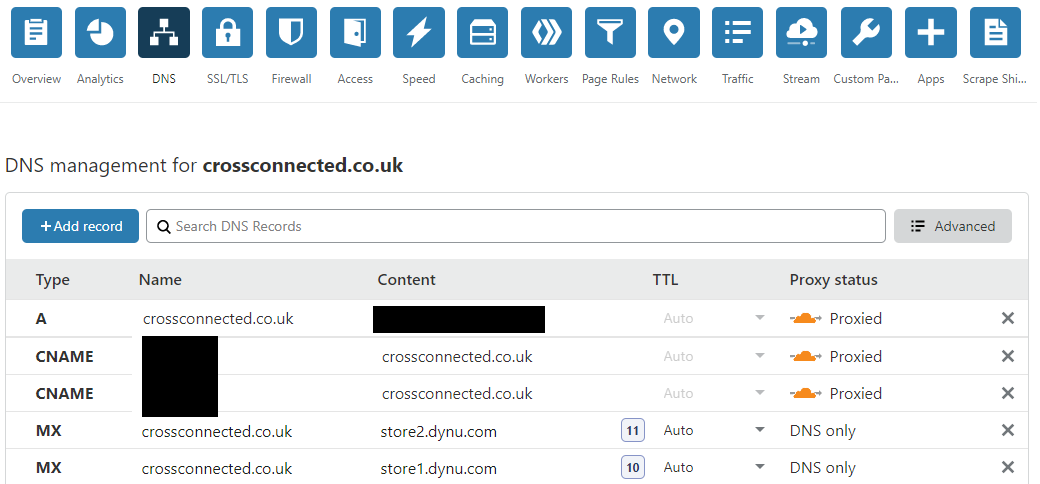
In some instances however, masking your server IP address is unavoidable, given that Cloudflare will only proxy traffic using the HTTP protocol. For example, traffic sent over the SMTP protocol cannot be proxied via Cloudfalre – hence any MX records (the records that tell email servers where to send mail sent to your domain) have to expose the underlying IP address. This inability to proxy any traffic other than http is one of the reasons why I chose to use Dynu.com’s Store and Forward service, as this requires using Dynu.com’s MX records. These records point to Dynu.com’s servers rather than my own, hence I still mask my IP address whilst not being able to use Cloudflare’s proxy server (as shown in the below image).
Once this is setup, if you do intend on running a website for the domain, in addition to adding DNS records pointing to this web server, you may wish to consider configuring Cloudflare’s SSL settings. However, this isn’t required for our specific use case (our mail server), and it can be quite an involved process, going well beyond the basics. As such I will save these steps for another post.
With luck you now have the following set up and can continue with my next post:
- A custom domain
- A static IP or dynamic DNS setup
- A locally running mailserver (with a static local IP address)
- A free Cloudflare account with Cloudflare’s nameservers configured for your custom domain
0 Comments