|
|
Support-ending notice |
|
|
Early November 2022, ownership of the Mail Integration for Office 365 / Outlook plugin transferred to WPO365. We are committed to provide (best-effort based) support for this plugin until the end of 2023. To ensure, however, that we are able to provide you with long time support, we urge you to download and install the WPO365 | MICROSOFT GRAPH MAILER plugin for WordPress instead (and de-activate the Mail Integration for Office 365 / Outlook plugin and remove it from your WordPress website). If you have already installed and configured the Mail Integration for Office 365 / Outlook plugin, then please make sure to check out our easy-to-understand online migration guide. |
||
|
– Marco van Wieren | Downloads by van Wieren | https://www.wpo365.com/ |
||
What does it do?
Put simply, the plugin relays all emails sent from WordPress through your Microsoft email account (or an account of your choosing, for example a shared mailbox). This helps improve the deliverability of your WordPress mail, as Microsoft’s mail servers are set up to avoid being flagged as spam, and should already be configured as the trusted mail server for your domain.
Note, attachments are supported, but only for files up to 3MB in size (this is the maximum request size for calls to the Microsoft Graph API). In addition, the account cannot be a free account such as Live, Outlook.com, Hotmail etc. as Microsoft has not enabled the Graph API for such accounts. The plugin should however work with the paid for personal and business versions of Office 365, Outlook and Microsoft Exchange.
Great, but doesn’t one of the many SMTP plugins do this? Why another WordPress mail plugin?!
Microsoft has disabled basic authentication (username and password) over the SMTP protocol, requiring more modern and secure methods of authentication such as OAuth 2.0 (the protocol used by this plugin). As such most of the SMTP plugins available do not support Office 365/Outlook, or if they do, the functionality is a paid for feature.
Without going into too much detail, OAuth 2.0 requires the Client (in this case our WordPress Plugin) to request a set of keys to our mail server, using the four pieces of information outlined below.
- Client ID: this lets Microsoft know which authentication server to go to to authenticate the client
- Client Secret: this is a unique key linked to your Microsoft Account that should only be held by trusted clients. It allows Microsoft to know that the client is genuine and has permission to request the keys for the requested resource (in this case your Microsoft mail server)
- Tenant ID: this is a unique key to identify your Microsoft account.
- Redirect URI: this is the location to which the keys are returned by the authorisation server once successful authentication has occurred.
Great, so what are the prerequisites?
To start using Mail Integration for Office 365, you need to setup a Microsoft Azure Active Directory account. Azure Active Directory comes in several flavours (paid and free), but it is possible to use the free tier for the purpose of this plugin. You can register for this here (you’re probably already registered if you are using Office 365): https://azure.microsoft.com/en-gb/services/active-directory/.
You will also need SSL enabled for at least the admin side of your website to ensure the OAuth keys are exchanged over a secure connection.
Plugin Setup
Step 1 – Download and Install
The plugin can be downloaded from the WordPress plugin repository (link provided below), or installed from the Plugins area of the admin side of your site. Remember to activate the plugin after installation!
Mail Integration for Office 365 by Cross Connected – WordPress plugin | WordPress.org
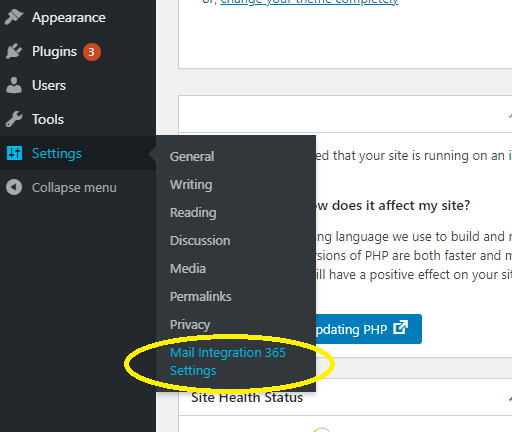
Step 2 – navigating to the plugin settings
Once you have installed and activated the plugin, you will need to navigate to the plugin settings page. This can be found under the WordPress settings menu as pictured below (titled ‘Mail Integration 365 Settings’):
The page itself looks as follows:
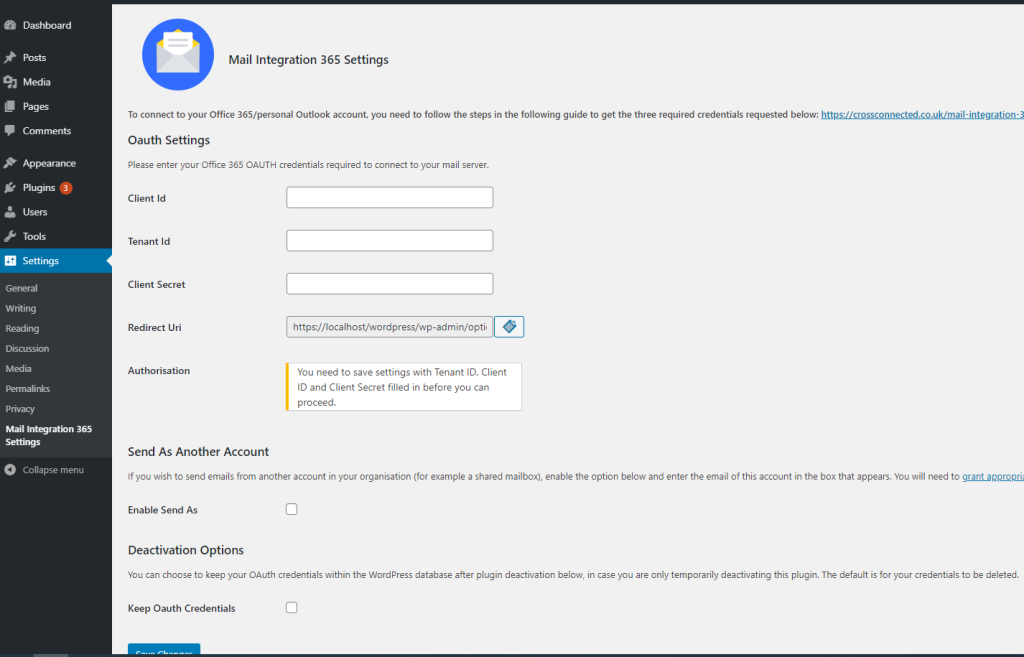
The other steps explain where to get the various required fields. However, for now, please simply copy the ‘Redirect URI’ field value and paste this somewhere so you can refer back to it (as it is required in Step 6 below). Make sure you copy the whole URI (when you click the box it will select the entire URI, highlighting it blue to indicate the selection).
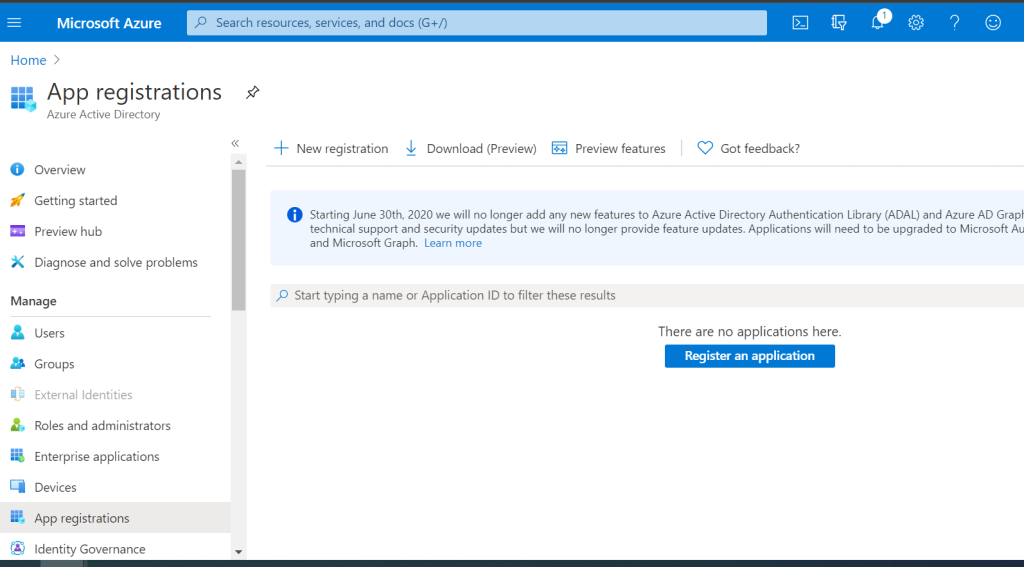
Step 3 – creating and registering the Azure Active Directory Application
Microsoft requires us to register an application that will handle the authentication requests to our mail server. To do this, we need to log into Azure Active Directory and click on ‘App Registrations’ in the right hand column menu. This will present the below screen, with a big blue ‘register an application’ button, or a list of already registered applications.
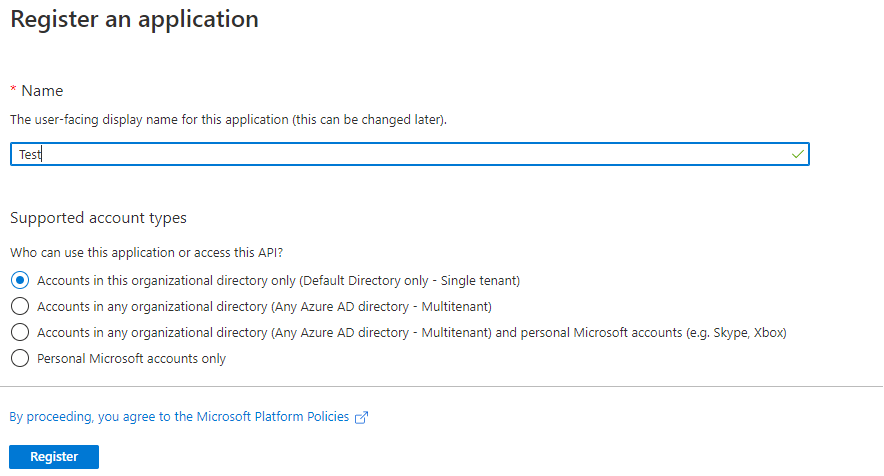
You can either click the blue register button, or the ‘New registration’ button along the top next to ‘Download (Preview)’ – both will display the below screen. Simply enter a name for the application (it can be anything) and select ‘Accounts in this organisational directory only’ (this should be the default option). If a ‘redirect URI’ option is also displayed you can ignore this for now – click the blue register button to proceed.
Step 4 – creating the Client Secret
We need a way of identifying that our client is who they say they are and that they have permission to be issued a key to our mail server. To do this we need to click on the ‘Certificates & Secrets’ menu option within Azure Active Directory as shown below.
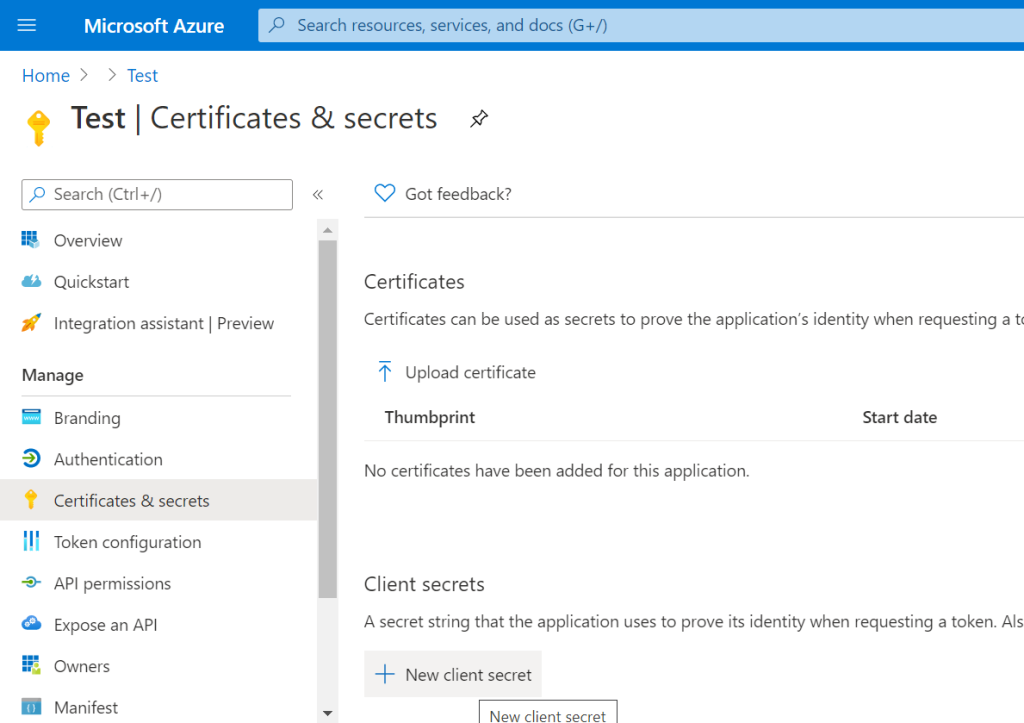
You then need to click on the ‘New Client Secret’ button under ‘Client Secrets’, entering a description for the secret within the popup that displays. By default the secret will expire after a year. However, you can set this to ‘never’ if you trust the client (WordPress server). This will avoid you having to remember to setup a new secret after a year or two, updating the plugin settings accordingly. There is a risk to this convenience though, and you need to weigh up the pros and cons based on your own security policies within your organisation.
Once you’ve decided on the expiry length, click add and the secret will be displayed for you to copy as shown below.
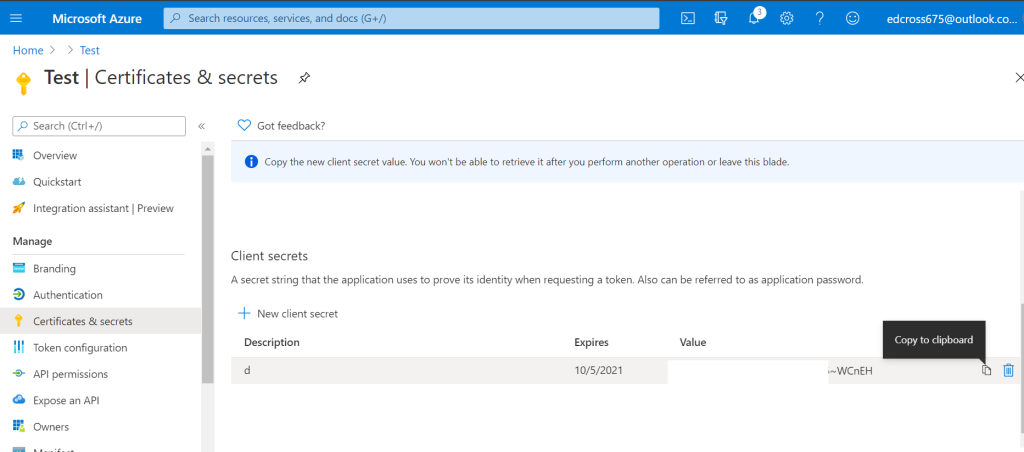
Please note that this secret should not be shared publicly and must be kept securely and only shared with trusted Clients!
MICROSOFT HAS ALSO ADDED AN ID ATTRIBUTE AT THIS POINT. DON’T COPY THE ID, COPY THE SECRET VALUE INSTEAD, OTHERWISE YOU WILL GET AN ERROR ABOUT AN INVALID SECRET LATER ON IN THE SETUP PROCESS!
The secret will only be displayed once within the certificates and secrets section of Azure Active directory, and you will not be able to copy it again once you reload the page. It is important therefore that you store it somewhere secure, or save it within the plugins settings straight away! If you forget the secret and you require it again, you would need to delete the previous secret and recreate it, following the same process.
Paste the Client Secret into the appropriate area of the plugins settings page. Do not click the blue save button on the plugin settings page just yet, as we still need to paste in the Client ID and Tennant ID that we will get in Step 5 below. Given that you’re not saving the settings just yet, you’ll need to keep the settings page open and not reload the page until you’ve added the Client ID and Tennant ID from Step 5.
Step 5 – copying the Client ID and Tenant ID to the plugin settings
To get the Client ID and Tenant ID, we need to navigate to the ‘Overview’ page of our Azure Active Directory Application. Here you will find both the Client ID and Tenant ID. If you’ve closed the application page from Step 4, you can get to this again by logging back into Azure Active Directory, navigating to ‘App registrations’, and then clicking on your application from the shown list (as outlined in Step 3 above).
The overview page looks as follows. We have circled both the Client ID and Tenant ID which will be unique to your own application. These need to be copied in full and pasted into the plugin settings page.
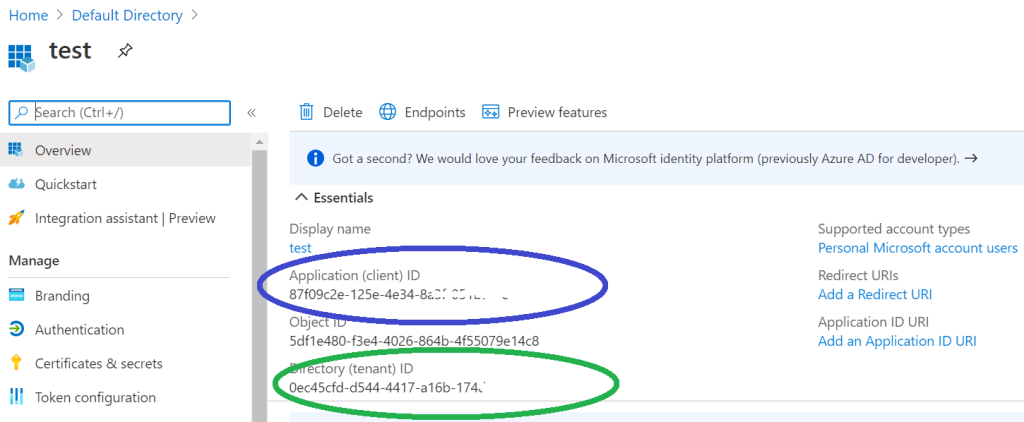
Once you’ve added these to the settings page (including the Client Secret from Step 4), you need to make sure you click the blue ‘Save’ button on the plugin settings page to ensure the plugin settings are saved securely.
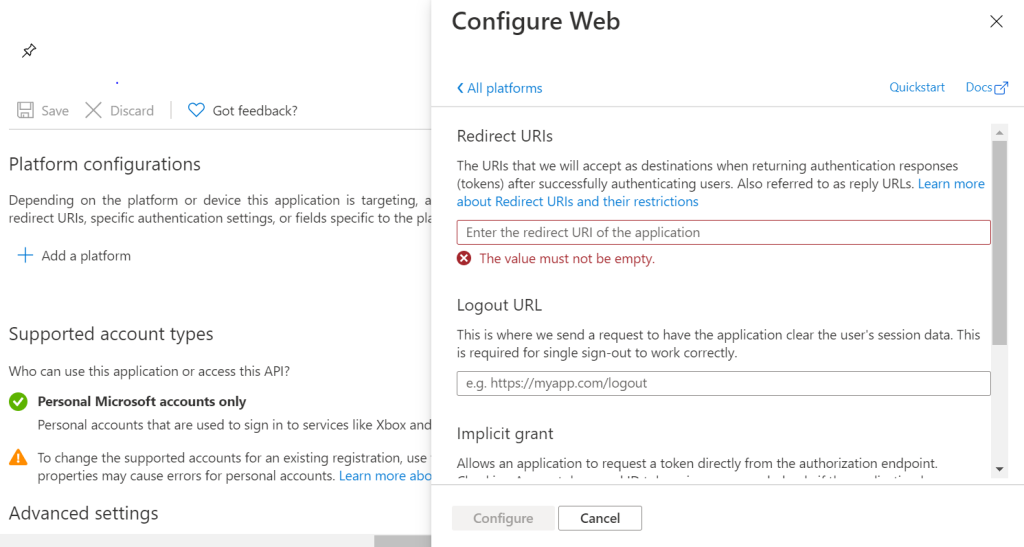
Step 6 – setting the application platform & Redirect URI
We now need to add the ‘Redirect URI’ we copied from Step 2 to our Azure Active Directory Application. To do this we need to navigate the ‘Authentication’ page of our app as shown below. You may have to click ‘Add a platform’ as pictured, in which case you need to select the ‘Web’ option under the ‘Configure platforms’ window that appears once the ‘Add a platform’ button is clicked.
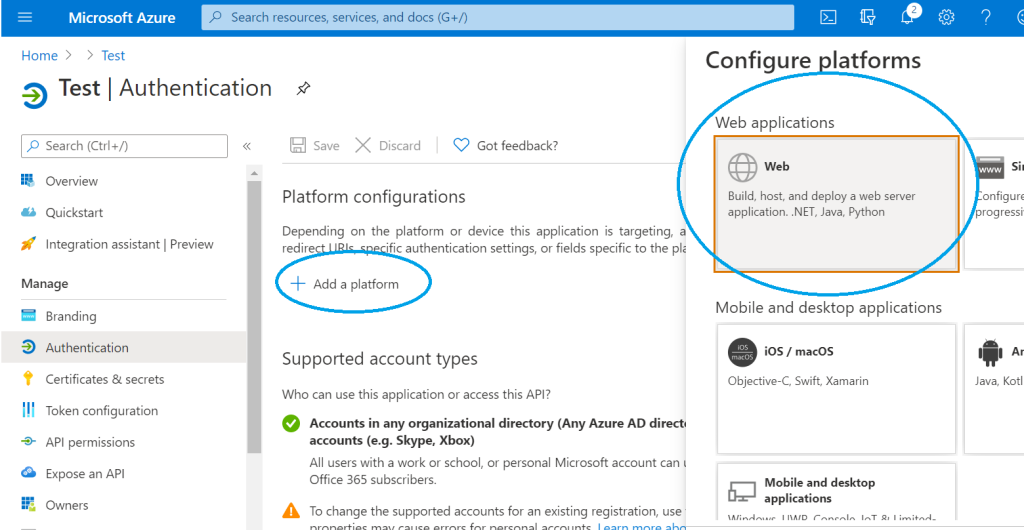
The next window that appears after selecting ‘Web’ looks as follows. This is where you need to paste the ‘Redirect URI’ and then click ‘Configure’. You can ignore the ‘Logout URL’ and ‘Implicit Grant’ options.
Step 7 – authorising WordPress to use your Microsoft Account
The final required step is to authorise your WordPress installation to use your Microsoft Account to send email. To do this we need to go back to the plugin settings page within the WordPress administration area.
Provided you have followed Steps 1 – 6 above, you should now see an ‘authorise’ button as pictured below. When you click this you will be redirected to a login page where you need to enter the login details for your chosen Microsoft Account (the account you wish your emails to be sent from).
Top Tip! If your browser is set to remember the login details for a different Microsoft Account to the one you wish to register with the plugin. To avoid the browser automatically using these saved credentials and registering the wrong account with your plugin, you should open a new in-private/incognito browser window before logging in to WordPress. You can then follow all the setup steps listed above. This will ensure that when you click the authorise button on the plugin settings page, you are prompted for the credentials of the account you wish to use, rather than logging you in automatically with your own saved account credentials and linking WordPress to the wrong account!
Step 8 (optional) – Send As Another User/Account
By default the plugin will send email from the account you have authorised to use the plugin under Step 7. However, if you wish to send email from another account within the same domain (for example a shared mailbox), you first need to grant the authorised account access to this other account.
Once you’ve ensured the account you have authorised with the plugin has access to send email from your other account, you need to enable the ‘Send As’ option as shown below.
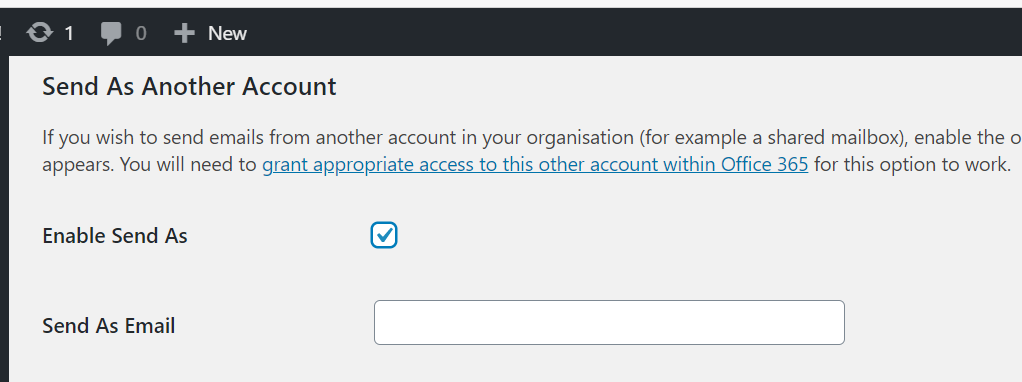
This will show a text box for an email address. Simply type the email address of the user/account you wish your mail to be send from and save the settings form (YOU CAN ONLY DO THIS FOR ACCOUNTS IN THE SAME DOMAIN AS THE PLUGIN’S REGISTERED ACCOUNT).
Donations
If you find this plugin useful and wish to aid it’s development, any donations would be greatly received.