This article will take you through the steps I followed to set up my Synology NAS, using Cloudflare to proxy my web traffic and secure in-transit connections to my server.
For those who don’t know about Cloudflare, they are an American web-infrastructure and website-security company offering a variety of services at differing cost brackets. They are also registered on the US Privacy Shield Framework, which at the point of writing, helps with GDPR compliance. Their free service includes DNS management, a reverse proxy and basic DDoS attack prevention, as well as free modern SSL services to help secure your server’s traffic.
Why Cloudflare?
So why would you want any of this when Synology offers QuickConnect and can manage Let’s Encrypt certificate generation and renewal? Well for me, Cloudflare provided:
- an added element of security, by masking my server’s IP address and providing basic DDoS protection. Arguably QuickConnect also offers some of this, but you cannot use your own custom domain
- a free caching service – helping reduce the load on my server
- the use of wildcard certificates (not currently supported by Synology DSM 6 for Let’s Encrypt). Synology does allow SAN lists within their Let’s Encrypt interface, but restricts the length to a few hundred characters, significantly limiting the usefulness when managing several sub-domains.
- autonomous management of my SSL certificates – I had found Synology DSM to be temperamental with it’s automatic renewal of Let’s Encrypt certificates and I wanted something that was largely set and forget.
Initial Setup
To get started you need to set up an account with Cloudflare, opting for their free service (unless you want the web application firewall and other features). The set up process will require you to migrate your domain’s nameservers over to theirs. Cloudflare will tell you the names of the servers to use as part of the setup process. It is also wise to replicate your DNS records before making the switch to make the transition as smooth as possible (just make sure you proxy any record that points to your server’s IP).
For records that you can’t proxy (for example MX records), if these point to your server, you may wish to consider using a relay service to be able to keep masking your IP (as discussed in this article). However, in some instances this simply isn’t possible, given that Cloudflare will only proxy traffic sent over the http protocol. As such, you will need to consider the security implications of disclosing your server’s IP address (something Cloudflare will notify you about if your DNS records expose your IP). Note, the nameserver transfer process usually takes a few hours, but to propagate fully across the globe, you’re probably talking at least 24 hours and maybe 48.
If you have a dynamic rather than static IP address, you will also need to add a custom dynamic DNS entry within the Synology DSM interface to update Cloudflare when your IP Changes. This great tutorial explains one way to achieve this.
Setting Up SSL
Once you’re set up and Cloudflare has registered the nameserver switch, you are free to start configuring the SSL settings. The Cloudflare SSL interface has settings for two types of certificate – the Edge (proxy-server) certificate, and the origin (your server’s) certificate. By default, Cloudflare sets up a universal wildfire edge certificate for your domain (wildfire meaning the certificate will be valid for any sub-domain you create), as well as providing an interface to generate an origin certificate (should you need it).
The aim of our setup is to implement “SSL Full Strict” security. In laymans terms, this means the traffic sent from a browser to our server (via Cloudflare) is encrypted and authenticated using trusted SSL certificates at each stage of the journey. This is evidenced in the below diagram which shows padlocked (encrypted) traffic from the browser to the Cloudflare Servers (the edge part of the connection), and similarly for the proxied traffic to our origin server.
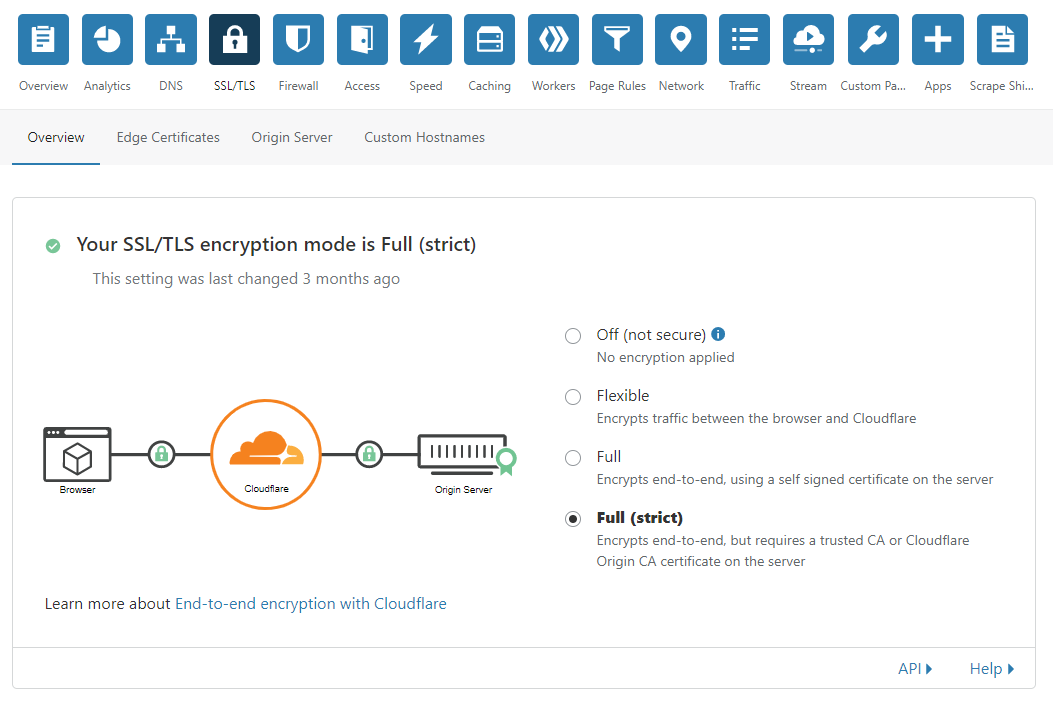
Now we could choose to just select “Flexible” or “Full” from the options available. However, “Flexible” only secures the first part of the chain (from the browser to Cloudflare) – the traffic sent from Cloudflare to our server not being encrypted. “Full” ensures all stages of the chain are encrypted, however, no validation is carried out on the certificate used for the second part of the chain (from Cloudflare to our server).
We want to ensure all our certificates are authenticated to help reduce the risk of man in the middle (MITM) attacks – hence why I have chosen “Full (strict)” which validates all the certificates in the chain. Of course, to validate all stages of the chain, you also need certificates that are signed by trusted certificate authorities (CAs). Until fairly recently, this would have required purchasing of a certificate, rather than the use a free self-signed certificate. However, the rise of the Mozilla Foundation backed Let’s Encrypt initiative has allowed anyone the ability to access free, secure SSL certificates signed by a trusted certificate authority recognised by most major browsers.
Synology provides a useful interface to create and renew Let’s Encrypt certificates, but lacks wildcard support as things currently stand. Nevertheless, it is possible to set up a Synology provided sub-domain and generate your own auto-renewing trusted SSL certificate for this sub-domain within the Synology interface, as this video explains. You could then redirect your Cloudflare DNS to this subdomain through the use of CNAME record, providing full-strict SSL for your website. There are some limitations to this approach however:
- I have found the auto-renewal of Synology Let’s Encrypt certificates to be temperamental (also Synology have yet to support the more robust DNS-01 challenge type that Let’s Encrypt have implemented).
- If you wish to use a split DNS for your network traffic, the lack of wildfire support, and character limits on SAN alternative names is pretty restricting if you have more than 5/6 sub-domains to manage. As such you will probably need to add the Root Origin CA to your Trusted Root Certificates. In fairness though, the same applies to the Cloudflare Origin Certificate.
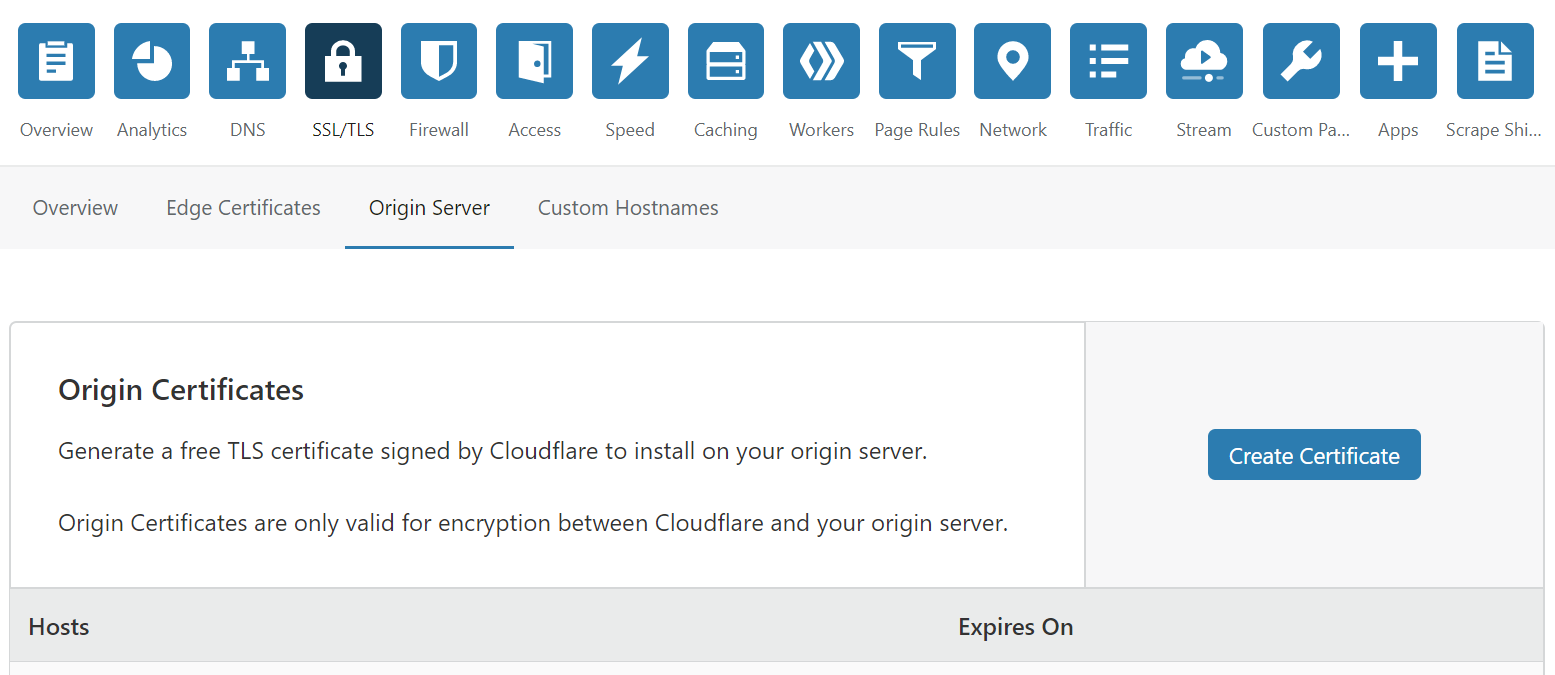
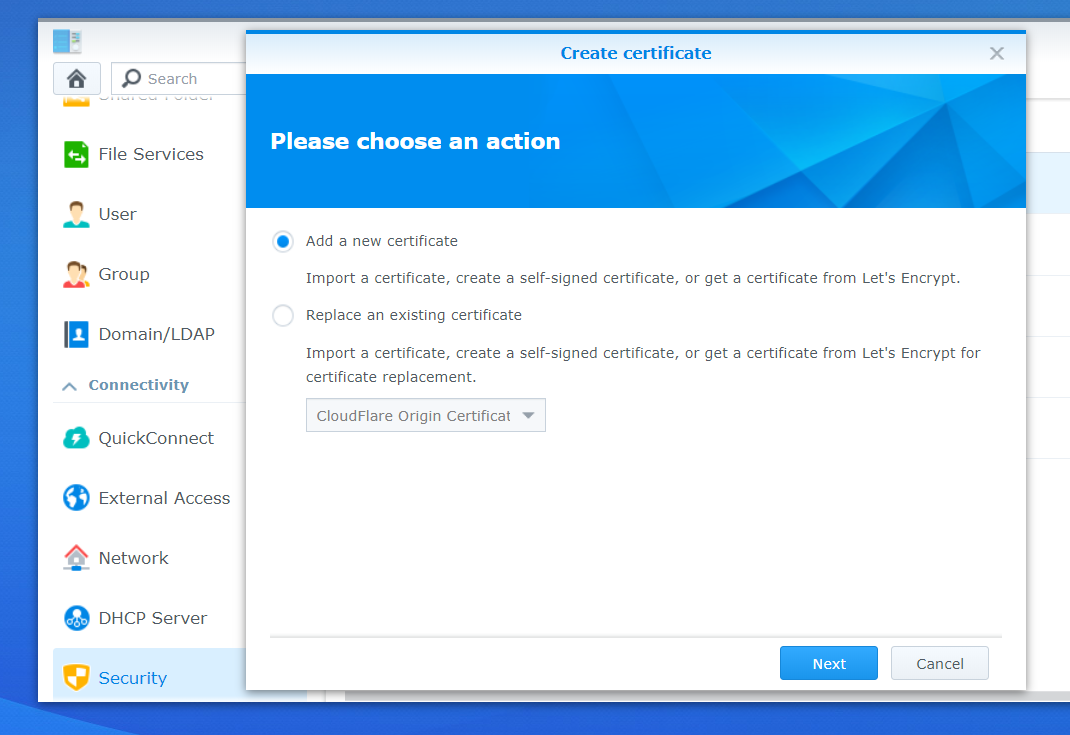
For the above reasons I chose instead to use an alternative Origin Certificate generated within Cloudflare for my domain. This is very easy to do, you simply navigate to the SSL/TLS settings for your domain within Cloudflare’s administration pages, selecting the “Origin” tab and then clicking on the blue “Create Certificate” button as pictured below.
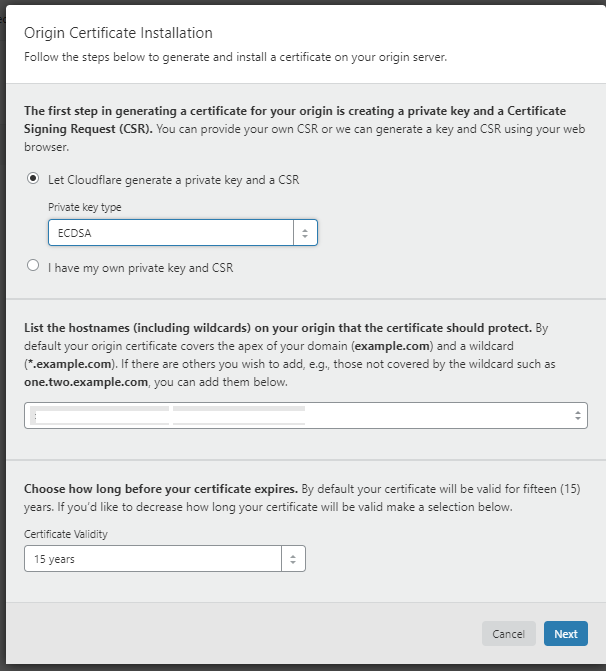
As shown below, you will have the option of letting Cloudflare generate a certificate, or using your own self-generated certificate (I personally chose to let Cloudflare generate the certificate). If you also opt for Cloudflare generation, you will be able to choose between either RSA (2048 bit) or the modern elliptical curve alternative (ECDSA) – both very secure. To help you decide, an explanation of the workings and pros and cons of elliptical curve certificates can be found in this article (note either RSA or ECDSA will work with Synology DSM 6). UPDATE – I’ve since been informed that ECDSA is no longer supported by DSM 6, so you’ll need to choose the RSA option.
Cloudflare also allows you to add entries for multi-level sub-domains not covered by the wildcard, as well as giving you a choice of expiry length (I chose the default 15 years, but the more security conscious may wish to choose a lower value).
Once you’ve added/selected your chosen values, Click the blue next button to generate your Origin certificate.
Once generated, Cloudflare will ask the format for your certificate signing request (CSR) and private key – choose PEM and proceed to copy the resulting text values into two separate text files. The filenames don’t matter, but I tend to name mine using the following structure cloudflare.mycustomdomain.crt and cloudflare.mycustomdomain.key. Note, the private key will only be displayed once in this window, and it is not password protected/encrypted. Hence it is important to save this somewhere secure.
The final step is to download Cloudflare’s Origin CA root certificates – the exact type depending on whether you opted for an RSA or ECDSA origin certificate. The links to the certificate can be found on the following page. However, for your convenience the file download links are as listed:
UPDATE – I’ve since been informed that ECDSA is no longer supported by DSM 6, so you’ll need to use RSA.
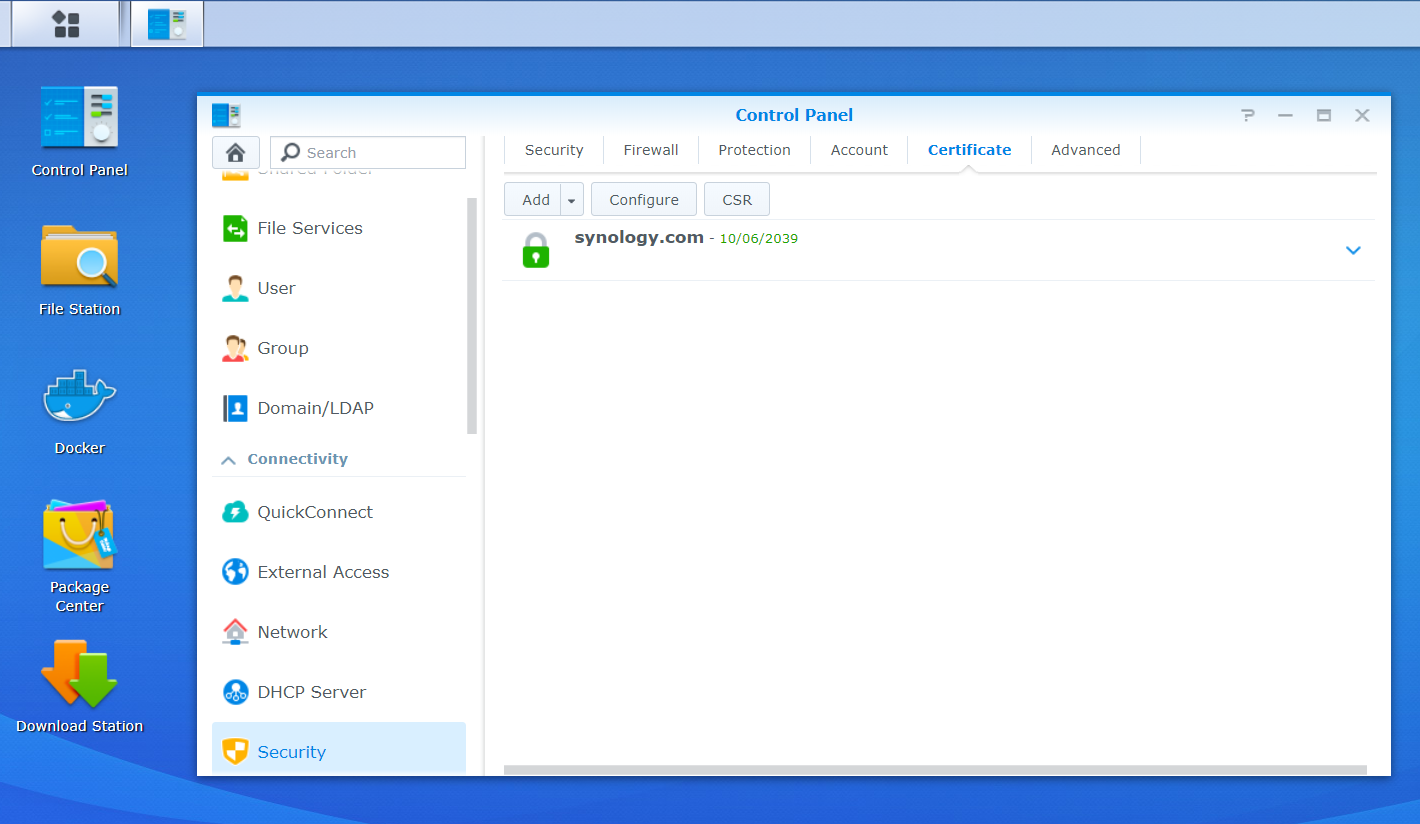
You should now have three files – your origin certificate, your origin root certificate, and your origin’s private key. You can now proceed to login to your Synology’s administration area to import the certificates to your server – navigating to “Control Panel -> Security -> Certificate” as shown below.
The certificates area will show all the certificates registered on your Synology NAS. You will need to click “Add” button, choosing the “Add new certificate” option before clicking “Next” as shown below.
Type a description for the certificate (for example Cloudflare Origin – domain name) and keep the “Import certificate” option checked. You may also wish to make this the default certificate for the server. I have personally chosen to do this, as nearly all my traffic comes via Cloudflare, and in instances where it doesn’t (for example my VPN which can’t be proxied using Cloudflare), I set a different certificate for this using an alternative domain.
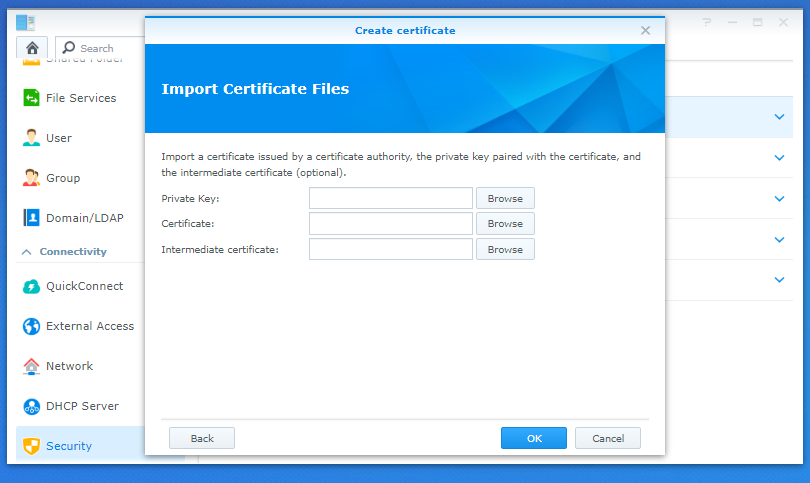
Click “Next” to continue. The following window will appear. You need to navigate to click the “Browse” button for each of the entries. Navigating to the three files you just generated for your Cloudflare Origin Certificate – the files relating to the entries as follows:
- Private Key – the key file you generated
- Certificate – the certificate signing request you generated
- Intermediate Certificate – Cloudflare’s Origin Root CA file you saved
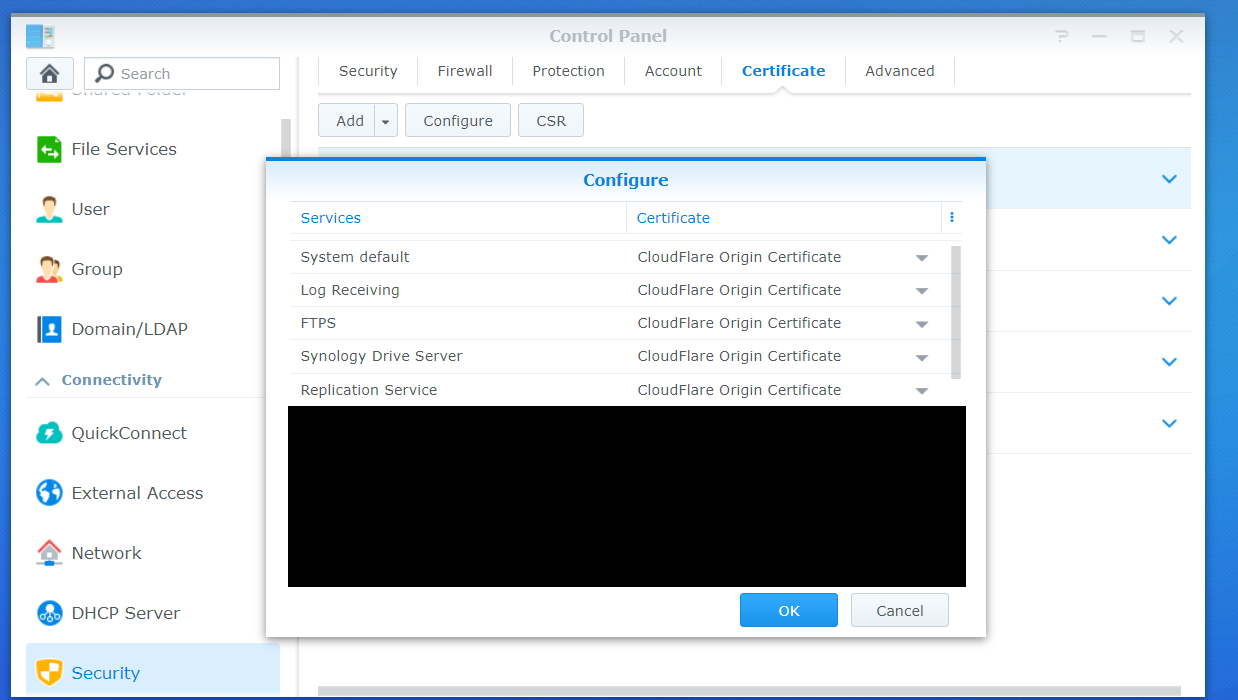
After clicking the blue OK button, your certificate should be imported successfully. For those who need to assign the origin certificate to certain services, rather than making it the default, you will need to navigate to “Control Panel -> Security -> Certificate”, clicking on the “Configure” button as shown below. It is then down to you to select the services you wish to assign to the origin certificate (for example, Synology Drive Server and any Web Station virtual hosts).
Forwarding Incoming IPs
Given traffic from Cloudflare is being proxied, we need to make sure our Synology NAS isn’t logging Cloudflare’s Serer IP addresses, and is instead logging the IP address of the originating request. This is desirable as firewall rules and lock out events may be effected if our server is not seeing the request IPs, potentially having undesirable security implications.
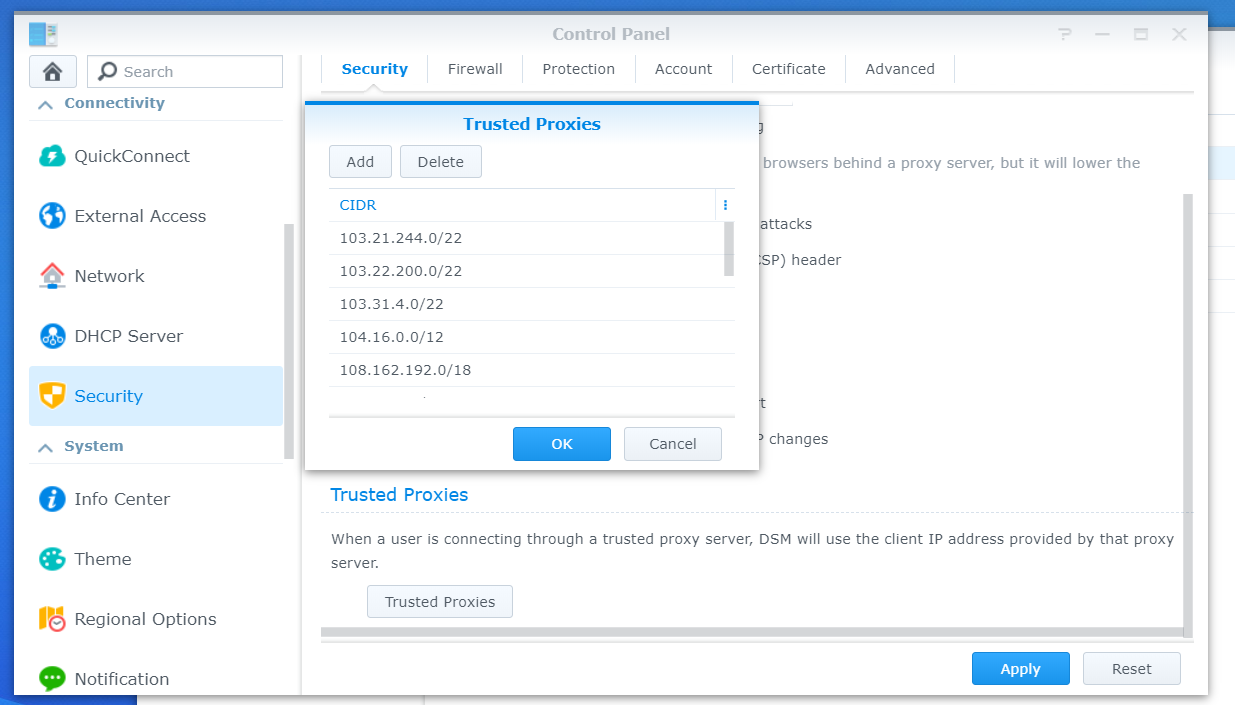
To log the correct IP address, we need to navigate to “Control Panel -> Security” and scroll down on the “Security” tab until we see the “trusted proxies” button. Click on this and the following window will open where you need to enter this list of IP addresses provided by Cloudflare in CIDR format. Note you need to add both IPv4 and IPv6 addresses – the list can also change from time to time, so it’s worth keeping an eye on, updating the trusted list if required.
SSL/TLS Hardening
So now we’ve set up our origin certificate on our Synology device, I would advise you to make the following tweaks to ensure that (where possible) we are:
- using the most up-to-date protocols the client’s browser supports (note, for Cloudflare’s free accounts, ciphers are set based on your choice of protocol as listed here. In my view these represent a good balance between browser compatibility and security, sufficient to still get an A/A+ rating on SSL labs for TSL 1.2+, hence the inability to set ciphers is not a significant limitation)
- implementing policy mechanisms to guard against SSL Stripping and Man in the Middle attacks
- enforcing SSL for all traffic (this is optional)
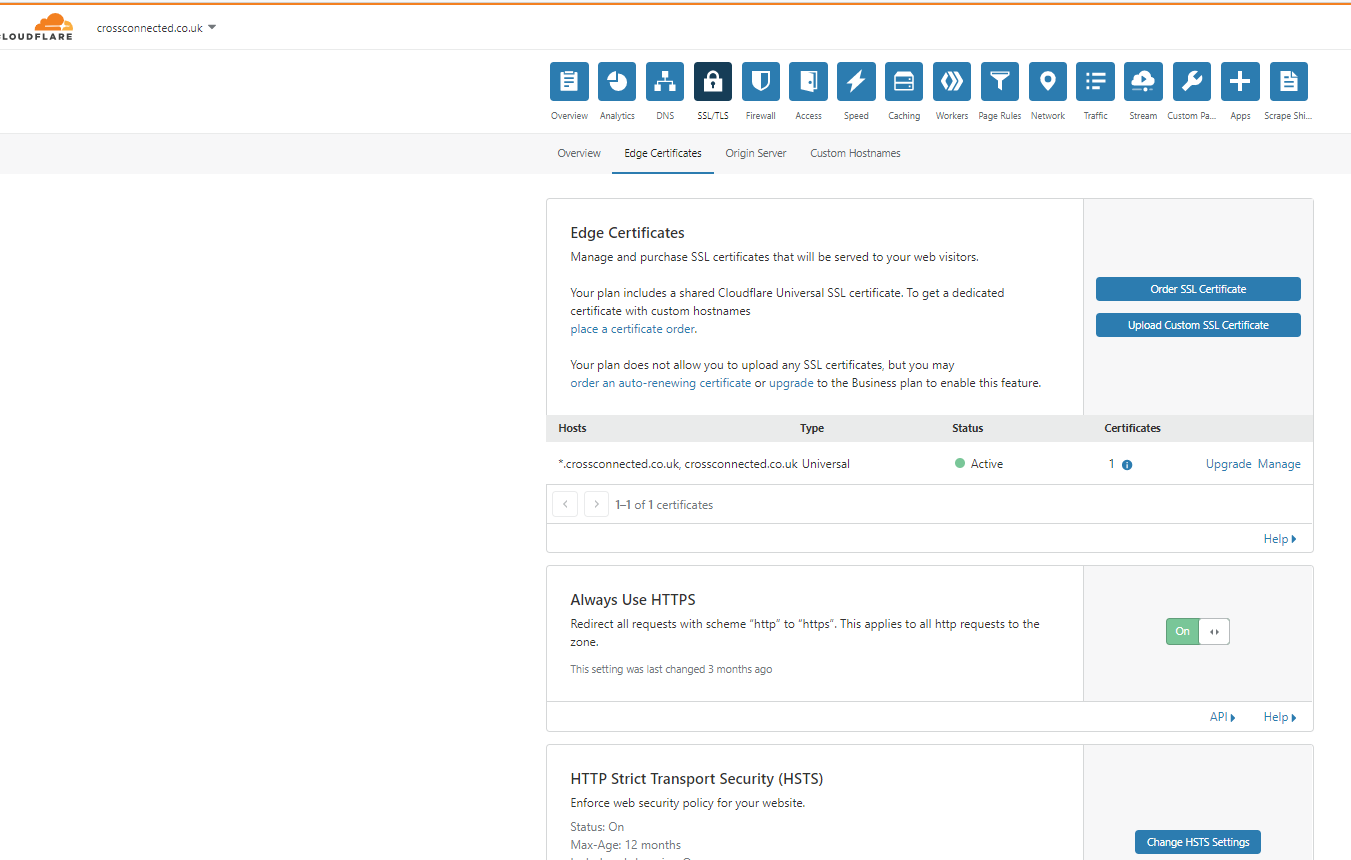
To tweak the settings we need to navigate to navigate to the “Edge Certificates” settings within Cloudflare’ administration pages for your domain (found under the SSL/TLS menu and Edge Certificates menu, as shown below).
I would recommend changing the following settings:
- setting the “Minimum TLS Version” to 1.2 – this ensures only modern TLS protocols are used
- setting “Opportunistic Encryption” to On – this allows the client to benefit from HTTP/2 performance features if available
- setting “TLS 1.3” to On – this enables the latest TLS protocol, if the client’s browser is compatible
- setting “Automatic HTTPS Rewrites” to On – this helps to protect against mixed content errors (but note it doesn’t necessarily rewrite all http links to https)
- configuring “HTTP Strict Transport Security (HSTS)” – this is one of the more obscure and hardest to set up settings, but arguably also one of the most important settings (to avoid SSL stripping and man in the middle attacks, as this article explains). Enabling HSTS on Cloudflare requires several steps as follows:
- reading and accepting the acknowledgement deceleration shown after clicking the blue “Change HSTS Settings” button
- Enabling “Enable HSTS (Strict-Transport-Security)”
- Enabling “Apply HSTS policy to sub-domains (includeSubDomains)”
- Enabling “No-Sniff Header”.
- Setting “Max Age Header (max-age)” to the recommended 6 month value (unless you’ve enabled the “preload” option, for reasons explained below).
If you wish all your websites traffic to be over https, I would suggest you also enable the following settings under the “Edge Certificate” settings page. However, make sure you check that compulsory https does not cause issues with your server (especially if enabling preload under HSTS, as you will not be able to remove compulsory https quickly if HSTS preload has been setup).
- setting “Always Use HTTPS” to On (this ensures all traffic to your server is secured)
- enabling “preload” under the HSTS configuration. It is important you understand the implications of this action for non-https traffic. Effectively your site will have to run everything over https, and it is not easy to reverse this quickly. Incorrect preload configuration can expose you more than it protects you (as this article explains). It is only something I would recommenced therefore, if you understand the implications. If you do decide to enable this, you must also register your domain with the following site which will require your Max Age Header to be set to at least 12 months.
The final step is to make sure the SSL/TLS encryption mode is set to full strict under the SSL/TLS Overview page of Cloudflare (as shown below).
There is also an additional step you might wish to consider (Authenticated Origin Pulls) within the Origin Certificate settings page of Cloudflare. This setting allows your server to cryptographically validate that a web request is coming from Cloudflare’s servers, stopping circumvention of Cloudflare’s security measures if your server’s IP is accidentally leaked.
This is of course a very desirable feature, but it is quite complicated to setup within the current Synology interface. Indeed, it requires SSH access to edit raw files for NGINX and/or Apache – the exact edits being specific to an individuals current setup (e.g. the web servers in use, the number of virtual hosts, and whether or not local network access is required). You will probably also have to write scripts to trigger at boot and after updates, to ensure your edits are not rewritten when your Synology updates or reboots.
Given this adds an additional level of complexity I am not going to cover the Authenticated Origin Pulls feature in this article. Hopefully Synology’s forthcoming DSM 7 update may provide a better interface to easily add this functionality, without the need for shell access and custom scripts. However, in the mean time, the best advice is:
- to ensure your server’s IP is kept masked via Cloudflare’s reverse proxy
- you don’t expose your server by opening up unnecessary ports
- you keep your server updated
- you use a firewall on your server that only allows traffic over essential ports and protocols, and where possible, limits traffic to only trusted clients
- use a local VPN (for example Synology NAS’ VPN services) to access any services that don’t need to be exposed via port forwarding.
16 Comments
Jordy Maes · 12 November 2020 at 18:24
This is a good blog article. I’ve tried it myself on my NAS but I found some limitations for my functionality.
Cloudflare does not support every port on their “Proxy” (orange cloud), thus setting this up for the default DSM port is impossible.
Do you have any suggestions or tips how to overcome this challenge?
Will Synology Drive, Backup station etc still work?
By the way, Synolgoy doesn’t support ECDSA certificates (anymore). Tested this in DSM 6.2
edward.cross · 21 November 2020 at 12:43
Hi Jordy thanks, glad you like it! This is an annoying limitation of Cloudflare and unfortunately I don’t use Synology Drive or Backup Station to vouch for their compatibility (I use Syncthing and HyperBackup). However, the way I’ve got around it for Syncthing is to create a subdomain in Cloudflare (for example sync.mydomain.com, accessed over port 443). I then use this to create a reverse proxy on the Synology, forwarding this traffic to localhost on whatever port Syncthing is running (this tutorial describes how you do this within DSM). In my experience, as long as its http protocol traffic, this will allow you to use Cloudflare for services utilising unsupported ports. Thanks for the update on ECDSA, I’ll change that in a sec.
Fabio M Costa · 30 November 2020 at 00:56
Thank you Edward and Jordy!
I’ve been trying to setup my Synology NAS with TLS on Cloudfare for about 2 days, and my problem ended up being the port, as pointed out by Jordy.
I changed it to the ones supported by Cloudfare https://support.cloudflare.com/hc/en-us/articles/200169156-Which-ports-will-Cloudflare-work-with- and it worked!
For the readers, to change the port go to “Control Panel > Network > DSM Settings > DSM Ports” and change your HTTP and HTTPS ports to supported ones.
Edward · 1 December 2020 at 14:14
Hi Fabio, great, glad you found this tutorial useful!
Scott · 30 May 2023 at 01:28
Thank you,
Ive been banging my head against the wall for months on this going back and trying again and again, then I read about the ports you mentions, changed them in cloudflare, and set a reverse proxy upon the NAS and BANG, stright in !
JB · 8 December 2020 at 23:33
This is fantastic just what I was looking for thanks for putting the effort in to put this together!
Edward · 14 December 2020 at 12:06
Cheers John, glad it’s served it’s purpose :)!
James Marshall · 25 February 2021 at 12:53
Edward, thank you so much for such an excellent, well explained article. I am currently completely revamping my home theatre setup using the built in reverse proxy server and some Docker containers. This article has been invaluable in helping secure it with Cloudflare.
Just one note which might help others with a dynamic IP, while David’s guide you linked to was really useful, I eventually ended up using Kirill’s script (https://github.com/mrikirill/SynologyDDNSCloudflareMultidomain) as it made it much easier to add multiple domains and subdomains within the DSM UI.
Thanks again!
Edward · 28 February 2021 at 18:48
Thanks James, glad it was useful! Thanks for the tip on the DDNS.
N0vae · 22 May 2021 at 00:14
Hello,
Thank you for this complete article. Seems great !
I currently work with CloudFlare and a Synology at home but not using only “Full” mode (simple). I will try soon the part with intermediate certificates in order to pass to Full (stricit) mode.
Any specific advice ?
Cheers
Steve · 1 October 2021 at 19:28
Great work on this! I’m on DSM 7 and was able to get Cloudflare DNS proxy working by following your guide, then changing the DSM port to 8443, and adding the appropriate NAT Forward rule in the firewall. Then on the Photos and Drive IoS app, when you put your hostname in, add a :8443 to the hostname and select HTTPS and it will work.
Edward · 10 November 2021 at 11:25
Thanks for the update on DSM 7 Steve.
Alex · 23 February 2022 at 19:33
You might like to do a followup article with bot protection turned on as this will block some apps like DS-CAM from fully working (but can be mitigated with page rule to lower security on the websocket and API)
Dave · 31 July 2022 at 22:31
Hi, Followed your guide which is great and works a charm (thanks), but I’ve just setup a VM with the VMM and when trying to connect to a VM with the “Connect” button it loads the page but says “Cannot connect to the server”. It works perfectly fine when accessing it through the NAS’s internal IP so has something to do with CF. The URL it’s trying to access is: https://my.domain.com/webman/3rdparty/Virtualization/noVNC/vnc.html?autoconnect=true&reconnect=true&path=synovirtualization/ws/70e6f827-cc1f-43cd-b778-00fbf369c689&title=NS1&app_id=94930208-63f7-4a80-b7e3-2ed78e595da1&kb_layout=en-gb&v=2.6.0-12122&app_alias=
Any ideas how I can resolve this so it works through CF?
Edward · 22 August 2022 at 00:15
Are you trying to connect via SSH? I don’t believe you can proxy the SHH protocol with Cloudflare, it has to be HTTP traffic. This article is a little dated now though, as I’ve since learnt about Cloudflare Tunnels (https://www.cloudflare.com/en-gb/products/tunnel/). I think these existed back when I wrote the article, but they only become a free service as of April 2021. If I were setting this up now, I’d probably use a Cloudflare Tunnel, which can also be used to proxy SSH traffic, as explained here: https://developers.cloudflare.com/cloudflare-one/tutorials/ssh/ The main benefit of Tunnels, over the steps I’ve outlined above, is that you don’t have to port forward/open ports on your router, so provided you trust Cloudflare, it’s even more secure.
Bogdan · 30 April 2023 at 15:16
Hi Edward,
Thanks for the tutorial. However, I can’t get it working. I keep getting an error related to HSTS.
NET::ERR_CERT_AUTHORITY_INVALID
mywebsite.tld normally uses encryption to protect your information. When Chrome tried to connect to mywebsite.tld this time, the website sent back unusual and incorrect credentials. This may happen when an attacker is trying to pretend to be mywebsite.tld, or a Wi-Fi sign-in screen has interrupted the connection. Your information is still secure because Chrome stopped the connection before any data was exchanged.
I tried researching and found some recommendations saying it needs to be disabled on DSm but I can’t find this option anywhere. Do you know what I can do about this?