Background
If you already know what LUKS and hardware security modules are, you can ignore this bit and head to “What Will this Cover” below.
LUKS stands for Linux Unified Key Setup and it is actually a key management framework – the encryption is handled separately by dm-crypt (a disk encryption subsystem within the Linux Kernel). If you’re interested in understanding a little more about it, Zymbit themselves offer a pretty good overview here.
The title of this article is quite apt, as whilst LUKS is a powerful tool, if you set it up incorrectly, you’re gambling with your data. This is perhaps especially pertinent to headless devices such as the Raspberry Pi, as if you encrypt the root partition (and hence operating system hard drive), this can cause headaches when it come to booting the device, as how can you provide the encryption passphrase to unlock the operating system at boot?
Given the headaches encrypting the root drive can cause for headless devices, many may choose to use encrypted external drives to store their data, and not worry about encrypting the operating system. This may offer an adequate level of security for some situations, but the operating system drive can still log and store sensitive info that could be used to compromise the external drive. In addition, if you’re choosing to set the external drive to unlock automatically at boot, the key is being stored unencrypted on the root drive, and unless you’ve encrypted the root drive, that key is exposed and could be accessed to unlock the external drive. The only situation you’d be protecting yourself from in this instance, is if a thief just stole the external drive and not also the computer.
You can use SSH to unlock an encrypted headless device remotely, but this involves modification of the boot partition (as this article explains). What the Zymkey offers, is the ability to unlock the operating system drive securely, without the need to modify the boot partition to host an SSH server, or provide any form of user input. It does so by storing the key on the boot device in encrypted form, using it’s own hardware based private key to encrypt and decrypt the key upon boot. The private key used for the encryption is stored within a special chip on the Zymkey, and it is not possible to gain access to it (even using the API commands). Theoretically you could chip slice the silicon to read it’s contents, but that’s State Level actor territory. Your data would have to be pretty darn valuable, or you’d have to be exceptionally paranoid, to worry about such an attack vector!
That’s great I hear you cry, but couldn’t someone simply read the boot partition of the encrypted drive and copy the encrypted key, then load a new disk image on a new SD card; boot up the raspberry pi with the Zymkey attached and use the unlock API command of the Zymkey to decrypt the key (and thus unlock the encrypted drive)? In other words, how is this different to storing the key unencrypted on the boot drive?
The answer my friends is what Zymbit term “Measured system identity & authentication”, in laymans terms this means that the Zymkey generates a unique device ID or fingerprint based on a variety of parameters unique to the device in question, one of which includes the SD card itself. Hence, if you were to try the trick I’ve outlined above to decrypt the key, the Zymkey would detect it’s a new SD card, and even if you had the same Zymkey and Raspberry Pi, it wouldn’t allow you to unlock the key.
The catch is that you need to set up the Zymkey first, and then physically cut a little tab on the Zymkey using some pliers to “bind” the Zymkey to the device in question (enabling what Zymbit call “production mode” as described here). Once you’ve done this however, you can’t reverse it, so you better make sure you’ve set everything up right before doing so!
So that’s the background to this article, now to go through how you can set all this up for your own use case!
What will this series cover?
This is probably going to be a five part series:
- The first (this article), will outline the background to what the Zymkey is, and how you can use it to encrypt your SD card of your Pi securely
- The second article will expand this concept to external hard drive encryption and automatic unlocking at boot
- The third article will cover how you can potentially avoid having to bind your Zymkey to a specific device and SD card, to avoid you having to buy a new Zymkey every time your SD Card dies on you! The catch being that you do sacrifice a level of security, which might not be acceptable to some use cases.
- The fourth article will cover how you can add duplicate keys/passphrases to your encrypted LUKS drives, and backup the LUKS headers of each encrypted device, to cover yourself in the case of hardware failure of the Zymkey, or corruption of the LUKS drive headers.
- The firth article will cover how you can set up a perimeter breach action/s using the Zymkey trip wire and accelerometer to either self-destruct the Zymkey private keys Mission Impossible style, and/or delete the Cloud storage containing your drive keys as soon as a breach is detected.
So what’s this Zymkey thing do?
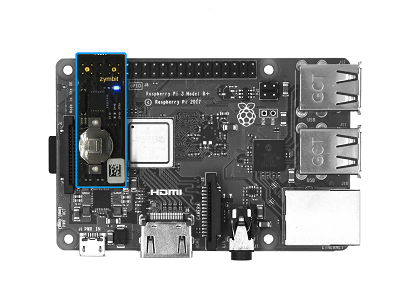
The Zymkey4 is a little device that costs around £35 (see the blue rectangle in the above image) and provides a whole range of cool stuff to increase the security of the data stored on your Raspberry Pi. Specifically, the device provides you the ability to:
- Create and store a range of cryptographic keys securely for authentication, encryption and data signing. The device has a special key generation chip that locks away any private keys. This is great for aiding secure hard drive encryption (both for the root operating system, and other external drives)
- Add tamper protection in the form of various sensors and accelerometers. These allow you to trigger a range of different actions when someone moves or opens the device case (including a Mission Impossible self destruct option, which destroys all private keys in the chip). There is also the ability to monitor the devices power, and trigger actions on power failure.
- Add a real time clock (RTC) to the Pi (providing you install the small cell battery) – in layman’s terms this means your Pi will be able to maintain an accurate time, irrespective of power, or status of the internet connection. This is useful and helps to limit NTP and other timing based security attacks.
Isn’t this all a little OTT?
The obvious answer to that is that it depends on what you’re storing on your device. However, I’m going to guess that most people understand the basic concept of encryption and would probably like the option to encrypt their data where available. I’m also guessing that many would assume if something has been encrypted it’s secure, but as I have outlined above, that may be grounds for a false sense of security. Indeed, this maybe of greater significance to small, headless devices such as the Pi which can easily be stolen (especially the micro SD cards used as a hard drive), and where people may opt for convivence over security upon device boot.
Devices such as the Pi are also used fairly extensively in IoT applications and remote sensing, where it may be essential to ensure collected data is protected from prying eyes or malicious alteration – the Zymkey enables you to both secure the storage of such data on the device, but also sign the collected data from sensors, so that you can be sure that the data received (either direct from the drive, or transferred over the internet) is the same as when as it was collected from the sensor. Temperature data is a classic case in point!
All this being said, I would agree, that to exploit some of the vulnerabilities I’ve outlined above in the background section does require a reasonable knowledge of the Linux operating system, LUKS and initramfs. However, the fact that it’s possible maybe reason enough to spend circa £35 on a Zymkey to give you peace of mind, (especially given that it’s relatively easy to setup with just some basic knowledge of the Linux command line)!
So how do I encrypt my OS Drive?!
For this, I’m not going to re-invent the wheel, given that Zymbit have provided a simple to follow guide that can be found here. Instead, what I will do is point out some potential gotchas, to note when following their steps!
- If you haven’t done so already TAKE A BACKUP OF YOUR DRIVE!! Given that we’re talking here about your SD Card/root operating system drive, I would advise that this is a disk image backup of the entire SD Card and all of it’s partitions, rather than a filesystem backup of files and folders. If you don’t know how to do this, this guide explains in the context of a Raspberry Pi SD Card
- If you’ve installed unattended-upgrade, or if you’re not sure, run the following command to disable it (you can reenable after the encryption process has completed)!
sudo systemctl stop unattended-upgrades - Make sure you turn off the Pi (
sudo poweroff) before you connect the Zymkey! - You need to enable the I2C interface within the Pi (if you have other I2C devices attached, you may need to remap the I2C address – the “Quick Start Guide” explains how to both enable the I2C interface and remap if required.
- You need to ensure curl is installed (run
sudo apt updateand thensudo apt install curl) - You need to ensure you’ve installed the Zymbit services onto your device – this requires knowledge of your operating system version – if Buster then use this command (I don’t like that they use these types of commands without some form of signature verification, but if you’re cautious like me, download the script before running it to check it’s not doing anything nefarious):
curl -G https://s3.amazonaws.com/zk-sw-repo/install_zk_sw.sh | sudo bashNote, as of writing, if you’re using 64-bit Bullseye, you’ll want to run this command insteadcurl -G http://s3.amazonaws.com/zk-sw-repo/install_zk_sw_bullseye.sh | sudo bash - Ensure you have an external drive larger than the operating system drive you’re seeking to encrypt, that you don’t mind fully erasing as part of the setup process (i.e. if you have data on it, back it up, as it will be destroyed)!
- If you want to make use of the RTC (real time clock) features and benefits, you’ll need to install a CR1025 coin cell battery. NOTE THE POLLARITY! YOU CAN DAMAGE THE ZYMKEY IF YOU GET IT THE WRONG WAY ROUND!
Provided you’ve followed the above steps, your device should have successfully restarted, and the blue LED on the Zymbit should be flashing once every few seconds. You can now follow the guide to encrypting your root partition from Zymbit!
If you’ve successfully done all that, and have an external hard drive you’d like to encrypt, continue on to part 2 of the series here.
0 Comments